Custom ESLint rules #5/5: use our plugin
Or how to nuke pineapple pizza code.

A collaborative Front End Software Developer with 17 years of experience, including 7 years focused on cutting-edge web development. Driven by a passion for continual learning.
In the previous bite, we crafted our plugin and we are ready to save your teammates from earing pineapple pizza! Here's how you can activate the rule in your project.
Use our custom ESLint plugin
Install your plugin along with eslint in your app package and init ESLint config:
yummy-pizza $ npm i eslint eslint-plugin-pizza -D -w app
yummy-pizza $ cd ./packages/app
yummy-pizza/packages/app $ npm init @eslint/config
NOTE: If you are not using a monorepo and just want to link your rules folder, you can link it this way:
"devDependencies": {
    [...]
    "eslint-plugin-pizza": "file:./eslint-plugin-pizza",
}
But I strongly recommend using a monorepo and installing it as usual using npm i
Give ESLint the answers of your choice, when asked to. The only relevant ones for this sample are:
What format do you want your config file to be in? JavaScript
Where does your code run? Node
The .eslintrc.js file is generated.
yummy-pizza/
├─ packages/
│  ├─ app/
│  │  ├─ src/
│  │  ├─ .eslintrc.js
│  │  ├─ package.json
│  ├─ eslint-plugin-pizza/
│  │  ├─ rules/
│  │  │  ├─ no-pineapple-pizza.js
│  │  ├─ index.js
│  │  ├─ package.json
├─ package.json
We just need to configure our plugin and rule! Note that given the eslint-plugin- prefix is a convention, in ESLint configuration we can just use pizza and it will be working out of the box.
// yummy-pizza/packages/app/.eslintrc.js

module.exports = {
  env: {
    es2021: true,
    node: true,
  },
  extends: "eslint:recommended",
  overrides: [
    {
      env: {
        node: true,
      },
      files: [".eslintrc.{js,cjs}"],
      parserOptions: {
        sourceType: "script",
      },
    },
  ],
  parserOptions: {
    ecmaVersion: "latest",
    sourceType: "module",
  },
  // "eslint-plugin-" suffix is not required, as it is a standard naming convention
  plugins: ["pizza"],
  rules: {
    "pizza/no-pineapple-pizza": "error",
    "no-unused-vars": "warn",
  },
};
To test out that our plugin works as expected on real code, we need to add a few files in our app.
yummy-pizza $ touch ./packages/app/src/eatPineapplePizza.js ./packages/app/src/eatPizzaMargherita.js ./packages/app/src/pizzaEater.js
Here they are:
yummy-pizza/
├─ packages/
│  ├─ app/
│  │  ├─ src/
│  │  │  ├─ eatPineapplePizza.js
│  │  │  ├─ eatPizzaMargherita.js
│  │  │  ├─ pizzaEater.js
│  │  ├─ .eslintrc.js
│  │  ├─ package.json
│  ├─ eslint-plugin-pizza/
│  │  ├─ rules/
│  │  │  ├─ no-pineapple-pizza.js
│  │  ├─ index.js
│  │  ├─ package.json
├─ package.json
Paste the following content.
// yummy-pizza/packages/app/src/eatPineapplePizza.js

export function eatPineapplePizza() {
  return "Pineapple pizza is yummy!";
}

// yummy-pizza/packages/app/src/eatPizzaMargherita.js

export function eatPizzaMargherita() {
  return "Pizza Margherita is the queen of all pizzas!";
}

// yummy-pizza/packages/app/src/pizzaEater.js

import { eatPineapplePizza } from "./eatPineapplePizza"

export function eatPizza() {
    return eatPineapplePizza()
}
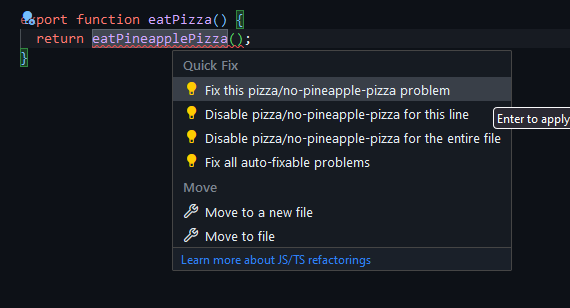
Final steps! Restart your IDE and you're good to go! If you're running VSCode, you may need to restart only ESLint server with Ctrl+P shortcut and selecting ESLint: Restart ESLint Server.
NOTE: using VSCode, you need to install the ESLint extension
Ah, no pineapple pizza is allowed anymore!

It is also autofixable. Neat!
Conclusions
Thank you for following along on this journey. I walked through these steps on my own some time ago and I wished I found a more detailed article on the matter, so I created my own. Hope this will save you some time.
If you want to check out the final code, you can find it here.
To the next bite!
References
Here is a useful blog post I checked out to learn how to create ESLint plugins. Hope you will find it useful too.


